|
Step 1:
Writing Sequences
 |
|
| - The Sequence Generators in Composer are very similar to
Wave Generators, which have already been dealt with in Tutorial 1. The
difference lies in that the Sequence Generators use as repeat element a
music fragment, which we will call sequence, and it should be written in an
external score editor such as
Finale or
Sibelius. The score editor used must
allow exporting to
XML format.

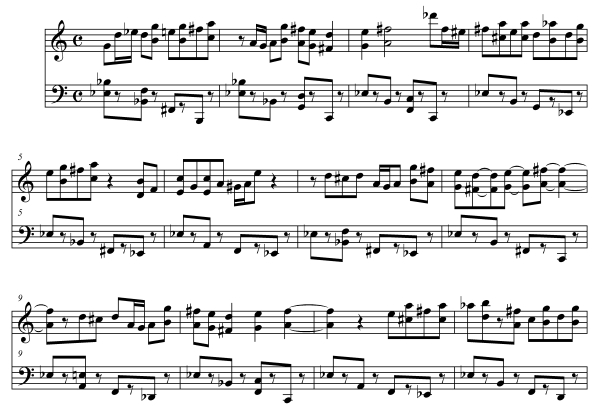
- As shown in the example, which contains the two sequences we will use
in this tutorial, these have to be written in the first measures of the file
and must always end with a simple double bar. The bars following the
sequences will not be taken into account by DM-D. For users of the
Finale
program, the DM-D template files include one, "insec.mus", to be used
directly in writing the sequences.
- Once they have been entered in the score editor, they must be exported
to XML format so that DM-D can read the sequences. In Finale2006 and 2008,
for instance, this tool can be found within menu File --> MusicXML. The file
name must always be "insec.xml" and this file should be saved in the DM-D
Working Folder (See step 1 of Tutorial 1). |
|
Step 2: First piece with
Sequences
|
|
| - We are going to generate the first piece using the
sequences we have written. In the Composer programming sheet we have
completed in Tutorial 1, we apply the following modifications:
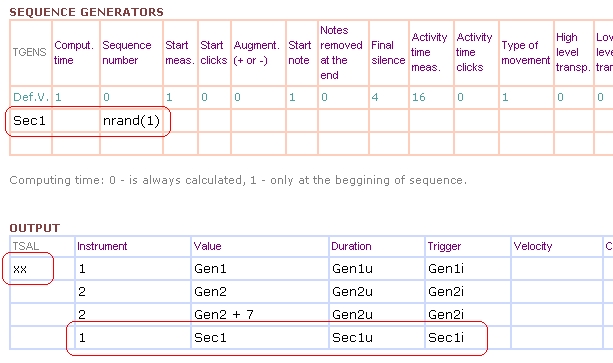
- The meaning of the above is as follows:
- First we have created a Sequence Generator, named "Sec1". We have
assigned a random value to the sequence of this generator, which can be
0 or 1. When its value is 0, it will use the first sequence we wrote; if
instead its value is 1, it will use the second sequence.
- In the Output table, we have cancelled the first written line. This is
the effect of writing anything in the first column. Replacing this, we
have written the last line, which assigns the Sec1 values to the output
of instrument 1 (Midi channel 1).
- Now, save changes, and set DM-D to composing. The result should be
something similar to this (remember that it won't be the same, as we are
using random values):

- As you can see, now the melody contains the melodic fragments of our
sequences, in a random succession. They are separated by a quarter silence.
This "Final silence" is one of the configuration boxes of the Sequence
Generators. It is expressed in sixteenths, and its default value is 4. It
may be modified from 0 (all sequences would appear one after the other
without separation) to a high value. |
|
Step 3: Improving the
treatment of Sequences
|
|
| - The melody we have obtained before is not very interesting,
as it limits itself to repeating the sequences as we wrote them. Let us try
some ways of transforming these sequences and thus improving our melody. We
shall write the boxed expressions in the Composer programming sheet:
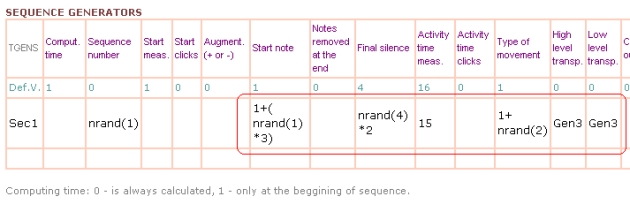
- The meaning of what we have written is as follows:
- Start note - This parameter allows the sequence writing to
start on a note subsequent to the first (the 2nd, the 3rd...). The
mathematical expression we have written varies randomly between 1 and 4.
This means that our sequences will randomly start by the 1st or the 4th
note.
- Final Silence - The value of the written expression may be
randomly 0, 2, 4, 6, or 8. That is the number of sixteenths that
separate one sequence from the next.
- Activity time meas. - The duration of the generator activity
will only be 15 measures. Measure 16 will thus be silent.
- Type of movement - This parameter modifies the sequences as
follows:
- If the value is 1, the sequence is written without modification.
- If the value is 2, the sequence is written applying a horizontal
mirror in the intervals (inversion).
- If the value is 3, the sequence is written applying a vertical mirror,
that is, the other way round, from the back to the front (retrogradation).
- Transport high and low level - These values make it possible
to transport the sequence for the number of semitones specified in the
boxes. By assigning Wave Generator "Gen3" value (See Tutorial 1), we
assign a ascending transport to the sequences oscillating between 10 and
0 semitones.
- Save file in BlockNote and activate Composer in DM-D. The resulting
piece could be something like this:
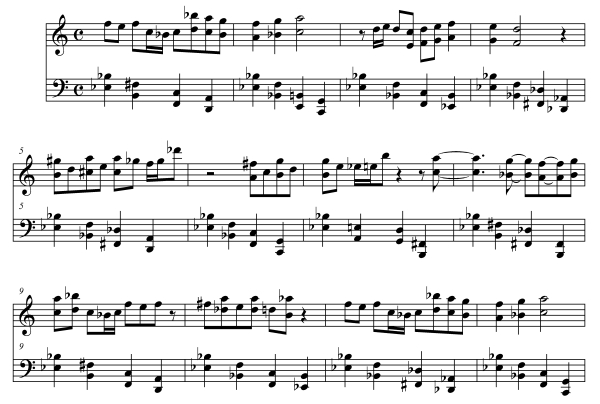
- Let us look at some of the "effects" of our modifications:
- Measure 1: Sequence 0, transported 5 semitones.
- Measure 3: Sequence 0, without the first three notes, in a horizontal
mirror (inversion).
- Measure 5: Sequence 1, in a vertical mirror (retrogradation) and
transported.
|
| |
Step 4: Tango Bass
|
|
| - After obtaining a more varied melody, it is time to take
care of the bass, and make it more like a Tango bass. To do so, we will
apply the following changes to the Output Table:
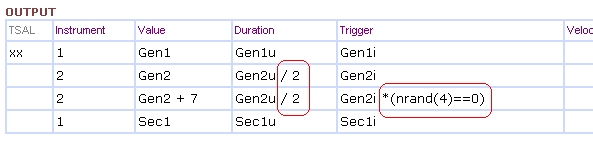
- What have we achieved? On the one hand, we have divided the duration of
the bass notes by 2. This means that their value will be half, one quaver,
imitating the marked and dry style of tango basses.
- On the other hand, we have introduced a random value so that the
reinforcing high notes occur only occasionally. This generates a sensation
of rather surprising accents, also typical of the tango bass. Saving the
file on BlockNote and activating Composer on DM-D the result should be
something like this (remember it will not be exactly the same, because of
the random values):
- At this point we have managed to create a sort of
organised "small piece" with a defined form and theme, i.e. its "outline".
However, as it does not respond to any specific harmony, it is probable that
it "sounds wrong". Let us see how to apply harmony, it means, COLOUR, to our
piece. |
| |
Step 5: Use of the Harmonizer
Module
|
|
| A - The basic use of the Harmonizer Module is quite simple.
Firstly we need to write the "Harmony sheet" with a score-writer that allows
exporting to XML, such as Finale or Sibelius. This sheet contains the "harmonic
colours" which we will use to "paint" or “fill in” our piece. For our Tango,
we shall write this harmony:
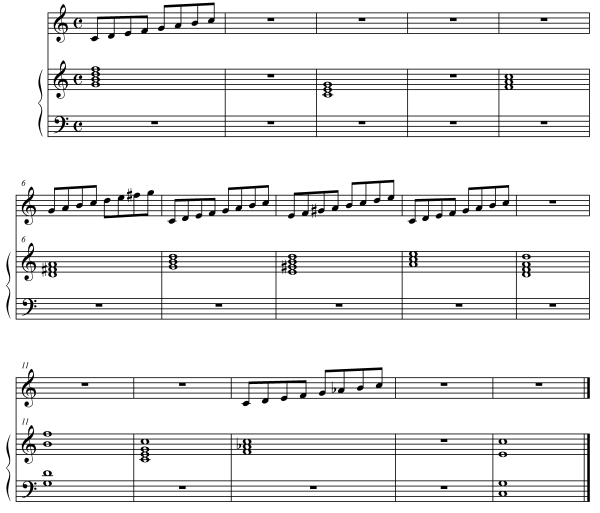
- The meaning of the Sheet is as follows:
-
The first staff contains information on the Scale to be
used to take the non-chord tones (passing, neighbor tones, etc...). The
scale is valid until a new scale is written.
-
The second and following staves contain the Harmony
information, i.e., the chord, that will be applied to the harmonization.
The chord is valid until a new chord appears. As can be deduced from the
example, these chords can be written in a single stave or in several (measures
11, 15).
(Note: It is not necessary to write the bracket or continuous barlines
in the lower staves)
B - Once the Harmony Sheet has been written, it should be
exported to XML format, as described in step 1 of this tutorial. The file
should be named "inarm.xml" and saved in the DM-D Working Folder.
- Now everything is ready to apply the harmonization. We do
this with the "Harmonizer" option in the DM-D menu. Once the process has
finished, a file named "outar.mid" is generated, containing the harmonized
piece. If we open it in the score editor, something similar to this should
appear:
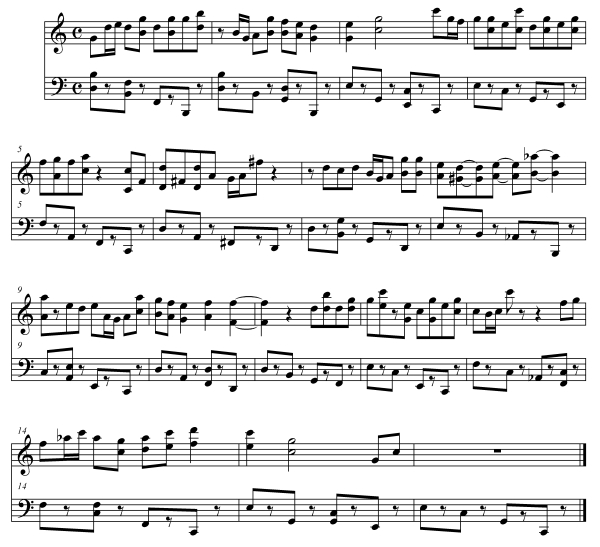
- As you can see, the piece is very similar to the one that had not yet
been harmonized, but its notes are adjusted to respond to the harmony we
have indicated. In addition, the harmonizer is intelligent, and able to
apply non-chord tones. With this, we respect the initial piece much more.
- The first piece we obtain will probably not be the best of all. If we
wish to repeat the entire composition-harmonization process, letting the
random values offer us different versions, we shall use the option "All"
from the DM-D menu. We can try several times until we obtain one we like.
- Lastly, if we wish to obtain the exact piece that appears in the
example and is played at the beginning of this Tutorial, we must write value
30566 in the field "seed" of the "Configuration" table in the DM-D
Programming Sheet. This seed initialises the random numbers. When its value
is 0 (default value), the seed is generated at random. When its value is
between 1 and 65000, the piece will always be the same for the same number. |
| |
Advanced uses of DM-D
|
|
- Throughout the 2 tutorials, we have described the basic use
of DM-D. However, DM-D allows more complex uses, which can be seen in the
Examples, which are also detailed in the
Documentation of the program, and
which we mention in summarised form:
- Composer: Generator Nesting - The DM-D Composer module
contains a compiler that turns it into a real programming language. This
means that, on the one hand, mathematical expressions of any degree of
complexity can be used in any of the fields of its tables. In addition,
it means that an unlimited number of generators can be used to modulate
other generators. This means that significantly complex musical
programming can be carried out.
- Composer: Sequences as Graphics or Matrices - The musical
sequences can be used as graphics or control matrices. Deep down, music
writing is a kind of time graphic in two dimensions. This characteristic
means it can be used as a time control parameter in mathematical
expressions. This achieves the paradox of being able to control the
music from within the music itself. It is very useful for instance, in
controlling aspects of musical form.
- Harmonizer: Bass and Melody following - The configuration
file "conar.txt" makes it possible to adjust many operation parameters
of the Harmonizer module. It can be accessed through the DM-D menu in
Options, Edit Harm. Options. The first we mention is the following of
the Bass or the Melody [Mel Ins] and [Bass Ins]. These make it possible
to force the higher notes of the melody and the bass to coincide with
those of the melody and bass of the chords written in the Harmony Sheet.
This means it is possible to respect a specific bass line or melody.
- Harmonizer: Line Control - The Harmonizer module performs a
tracing operation prior to the harmonization to detect implicit melodic
lines. That is, it is able to find in arpeggios or musical fragments
with jumps, implicit melodies that it will treat as such, applying non-chord
tones, and trying to respect their profile. The parameters controlling
the lines are those of [Notes] section in "conar.txt".
- Harmonizer: Selection of Non-chord tones - It is possible to
control what types of non-chord tones DM-D will apply (passing tones,
neighbor tones, appoggiatura, escape tones), what voices it will apply
them to (bass, melody, intermediate voices), and the behaviour of these
non-chord tones. The control parameters of all this can be found under
section [ Non-chord Tones ] of file "conar.txt".
|
|
|
|
|